
Simple Troubleshooting: How to Fix Low Power or Jamming Issues in Your Head Shaver

Electric shavers, particularly multi-head designs like the Head Shaver, have become essential grooming tools for many users due to their convenience and efficiency. However, during regular use, issues such as “low power” (slower motor, difficulty cutting dense hair) or “jamming” (blades getting stuck with unusual noises) can arise, reducing shaving efficiency. Most of these problems are related to maintenance habits or usage rather than hardware failure. With a step-by-step troubleshooting approach, you can restore your Head Shaver’s performance quickly without needing professional repair.
Common Causes of Low Power or Jamming in Head Shaver
Before starting any troubleshooting, it’s important to understand the main causes of low power or jamming in electric shavers like the Head Shaver. Generally, these issues stem from three key areas: blades, power supply, and mechanical obstruction.
1. Accumulated Debris or Worn Blades
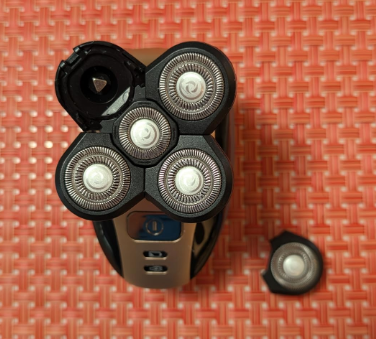
Most Head Shaver models use multiple rotating heads (commonly 3–5), which can trap hair clippings and skin oils in the blade gaps. Over time, this buildup can cause:
Blades stick, creating resistance and producing jamming noises.
Blockage at the hair intake, requiring more force and reducing cutting efficiency, making the shaver feel underpowered.
This is the most frequent issue for users with dense facial hair and can usually be resolved with cleaning.
2. Power Supply Problems
Battery-related issues are common in rechargeable Head Shaver devices:
Low charge: When the battery drops below 20%, some models enter low-power mode, slowing blade rotation.
Battery aging: After a year or more, frequent charge cycles can reduce battery capacity, causing inconsistent motor speed and intermittent jamming.
3. Mechanical Obstructions
Improper blade installation or foreign objects can interfere with blade rotation:
Misaligned heads may cause uneven force distribution, leading to jamming.
Hair fibers or cloth strands caught in the blade mechanism can reduce motor efficiency, causing low power or automatic shutdown in some models.
Step-by-Step Troubleshooting for Your Head Shaver
You can perform these checks at home without special tools, starting with the simplest and safest steps.
Step 1: Clean the Blades and Heads
Cleaning is the most effective step—around 80% of low power or jamming issues can be fixed this way.
Procedure:
Remove the heads: Turn off your Head Shaver, press the release button, and lift the heads gently. Avoid forcing them to prevent damage.
Brush off debris: Use the provided cleaning brush (or a soft toothbrush) to remove hair clippings and oils, focusing on blade roots.
Deep clean:
If water-safe (IPX7), rinse under lukewarm running water (<104°F), gently rotating the blades to remove trapped debris.
If not water-safe, use a small amount of mild soap with a brush, then wipe dry.
Dry and reassemble: Let heads air-dry fully before reattaching. Ensure they click into place with no looseness.
Validation: Power on the Head Shaver, run for 10 seconds, and check for smooth operation and reduced jamming.
Step 2: Check Power and Charging
If cleaning doesn’t resolve the issue, examine the battery:
Check the indicator lights: Green = full, yellow = low, and red = critically low.
Charge using the original charger for 2–3 hours.
If the shaver works normally when plugged in but not on battery, it indicates aging or depleted batteries.
Step 3: Inspect Blade Installation and Obstructions
If problems persist:
Remove and check blade alignment; clean metal contacts with alcohol if necessary.
Spin each head manually (with the shaver off) to detect resistance.
Remove hair or fiber obstructing the blade or bearing carefully.
Avoid Common Mistakes
When troubleshooting your Head Shaver, avoid these actions:
Using hard tools like screwdrivers or toothpicks may damage blades.
Removing heads while the shaver is powered on—risk of injury or damage.
Disassembling the motor yourself could void the warranty and compromise water resistance.
Advanced Solutions
If basic troubleshooting fails:
Battery aging: Replace with an original Head Shaver battery or contact customer service.
Blade wear: Replace worn blades after 6–12 months, especially if hair is pulled or skin irritation occurs.
Motor issues: Seek professional repair or official service; avoid DIY motor repair.
Maintenance Tips for Optimal Performance
Regular habits extend the lifespan of your Head Shaver:
Clean after every shave: Remove hair debris, and perform a deeper rinse weekly.
Replace blades regularly: every 6–12 months depending on hair density.
User Experience
Following these steps ensures your Head Shaver performs consistently:
Smooth, uninterrupted shaving even on dense hair.
Reduced skin irritation due to clean, sharp blades.
Extended battery life and reduced need for professional servicing.
Summary and Purchase Guidance
The key to resolving low power or jamming in a Head Shaver is a systematic approach: clean blades → check power → inspect mechanical components. Most issues are minor and can be solved without technical skills.
For replacement blades, batteries, or new Head Shaver models suitable for head or facial shaving, visit the product page here. Proper maintenance ensures consistent performance, prolongs device life, and enhances your grooming experience.